Sending Some September Sanity

September for me is a month of running. No matter how organized I think that I am, I am never fully prepared for all the activities. Perhaps it is because the schedules of everyone in the family are packed with PTA events, School open houses, sports and science program sign ups and Cub Scouts, not to mention careers and housework. Or maybe it is just too difficult to leap from the lazy days of summer to the hustle and bustle of fall. I know for myself, I tend to get a case of the hunker-downs or a deep seeded nesting instinct. This of course brings to the surface the need to wash all the windows to prepare for the upcoming beautiful scenery and breezes, and the desire to launder all the linens and pillows for those, “Oh so awesome,” snuggly nights.

So in order for me to be able to keep my cool, I try to write out a list of must do items and want to do activities. On my must do list, are the basic taking care of business filing of all incoming paperwork…school notices go up on the bulletin board, permission slips and emergency contact forms get filled out right away and sent off to school, and Cub Scout events get entered on the calendar. To keep up with all the fundraiser and holiday events, my motto is to prepare as early as possible because time has a way of sneaking up on you.
On my want to do activities list, are the family favorites of apple picking, pumpkin picking, Cub Scout camp-outs and fall decorating. So, as a family we try to go apple picking early which gets this checked off the list and makes for the best selection of apples.

The key to maintaining sanity and order in a mostly crazy world, is to schedule activities on a calendar and check it often. I also like to keep our family calendar in a highly visible area, so that everyone can see it and reap the benefits. So, if you haven’t done so already read a few of my past blogs and pick one or two of their organizing projects, implement it into your life and sit back and enjoy the zen!

Family Travel Made Easy

Well the summer is at a close and the kids are back in school. We had a blast the last few weeks of the summer vacation, including a small trip to the shore. In order to make my vacations start out smoothly, I always write down a packing list for myself and the kids. The husband, ha ha,  I let fend for himself. So I have created a few basic packing lists to share on my blog. Since I only have boys, I had to create a list for girls, I hope I included all the items a little girl would need. To start out, I put the bulk of the packing responsibility on myself or the “Mama”, since, let’s face it, we do most of the work. Then I created two more lists, one for boys and one for girls. If you don’t need these lists for the kids, then good for you, but these are a must for me. My guys get very excited about packing for a trip, so this list ensures that the packing doesn’t have to be done twice. Once by them and then unpacked and packed again by me. With these handy lists, I just include the amount needed of each item, the kids follow the list, and then off we go, literally. You can adjust the number of items needed, depending on the length of the trip. Sometimes I will also include some specific  items, for example, Logan’s favorite sweater, “the Gray Sweater”. You can add these little notes to help your kids gather their things more efficiently if you feel it is needed. I know that my boys like to have specific items of clothing for certain events, so I have to compensate for that or I have upset boys. I hope that this information was useful and it really makes my packing job a lot easier and a lot more fun. Good luck and happy travels!

Packing List for Mama

Packing List for Girls

Packing List for Boys

Organizing One Cabinet At A Time

Today was my husband’s birthday, funny that our birthdays are two days apart. It makes for a very fun and eventful week. Between all the running around and celebrating, I managed to include a bit of organizing into my day. I finished sorting and sifting through the remainder of my son’s school paperwork and filed everything as neatly as I could in the School Keepsake Box. I say, “as neatly as I can”, because there are always a few over-sized pieces of artwork. I found that if you do have a number of special pieces that won’t fit comfortably inside the Keepsake Box, you can always find an additional artwork holder or portfolio for the larger images that you do not want to fold. I have seen a really cute one on a website called “Lillian Vernon”. Eventually, I will probably break down and purchase this holder, especially since it is so adorable. But, in the meantime, I make do with what I have.

So, today I was able to clear out a cabinet that held a lot of random paperwork, which has now been filed or tossed. It is really a great feeling being organized or rather getting organized. The greatest thing about this blog and my organizational quest, is that it teaches my son and incorporates this habit and skill into his world. He even helps me come up with subjects for this blog when I get stumped and he enjoys listening to me read them out loud. The other day, my son told me that he was proud of me because I have been doing well with my blog. Now, tell me, does it get any better than that?

Happy Birthday To Me…!

Yep, it’s my birthday today and here I am blogging. You see for me, this is something that I truly like doing. My main objective about all these blogs is that people will actually enjoy them. So I will continue to try not to bore or overwhelm anyone with my words and projects. I appreciate all of you that comment on my posts and all of you that follow and read my rants. It has really been a joy to take on this blog experience and I hope that I will be able to keep the site new for all of my peeps out there. As you can see, I am not staying on topic here about organizing, but I just wanted to say thank you to all who have been following my blog, I really appreciate it and enjoy hearing from you. Writing my blog is an awesome way to end my birthday.

I will talk a bit about the organization of photos, just to keep you on track. The first thing you should do is to gather a bunch of photos together either actual photos or digital ones. Once you have a bunch, you can start the organizing process. I find that chronological is always the best way to start. These photos or files can be sorted by months or just by year, it all depends upon what you are going to do with your photos after they’re sorted. If you are just organizing and storing them safely, then yearly is fine. If you plan on making scrapbooks with the photos, then you have a few options. One way to sort would be by event, for instance is you are going to make a Christmas album, then you pull out all those types of pictures and put them into the album chronologically. You can also do an album by individual, but I find this to be a bit more difficult. A yearly scrapbook or even with one a few years in one book is my preferred method. I just pullout some photos and start making the pages and, with the type of album that I use, I can organize or rearrange the pages at any time. Like I said before, the most important thing to do is to start, just jump right in and before you know it your pictures will be organized. If you are organizing digital folders, once you have the files in one area, then your next step is to create yearly folders and drop all your photos into them. At this point you can then go into each yearly folder to create either monthly or event folders to organize your photos even more. This is a process, but once completed you will have all your precious memories happily store in one area.

One spring, I was asked what I wanted as a gift for Mother’s Day, I responded that I would love to have all my digital pictures of Logan (he was probably 3 at the time) on a disc. That Mother’s Day, my parents handed me a CD full of images of my son from birth to 3 years old. There was even a beautiful picture of Logan on the CD case. This was the best gift I could have gotten at this point, since I was way to busy running after Logan to print any photos. The next time someone asks you what you want for your birthday or a special occasion, give them this suggestion. Not only is it a fantastic gift to receive, but it is also economical for this day and age.

Learn to Organize Your Photos

I love to take pictures! Whenever we go out with the kids or my Mom and Dad or basically anyone, it is always a time for me to take out my phone or camera and shoot away. Since I started creating scrapbooks, I have learned how to take photos in a whole new way and now that everything is digital I can take a ton of pictures. So I wind up with stacks and stacks of photos or folders and folders full of digital images. As far as the printed pictures go, this can get overwhelming for many, but I can help. I previously worked teaching others how to organize their photos and how to get both the pictures and their memories down in albums. I always joke around with my Mom because of the way the photos were in our house while I was growing up. You could open up a drawer and find a hundred photos in there ranging from my prom to my grandmother’s 5th birthday to when my older brother was born. It was always an adventure. The only problem we would come across with this storage system, was that eventually people forget dates, times and even people and that is sad. The reality is this happens to all of us, I can’t tell you how many times I swore I would remember an event only to look back in a few years trying to figure out when it occurred. So, for me, getting my photos into albums and writing down a few quick notes about the events of that day are key.

In order to be able to take this step or start this type of project, you need to have your photos in hand and in some sort of order. To do this, I grab a “Creative Memories” photo organizer and start going through all the pictures. There are a number of photo-safe organizers out there, grab a big one and let’s get to sorting. If you put your mind to it, you can do this in a few short sessions. The important part is to not get sucked into memory lane, or you will not finish this project. So the basics are to have your bags or stacks of photos out, you will also need a bunch of post-it notes and a garbage bag. When you are going through the pictures be realistic, don’t save every pic of that cute kitten, throw away any out of focus shots and choose a few great shots. How many shots of the same subject do you really need? This is the hardest part for most, it is the letting go phase, but trust me, once you have chosen some fantastic pics, you won’t even miss those not so great shots.

The next step is to start the organizing, now there are a number of ways to do this, by date, by subject or by event. Date is the easiest, however, like me you might have already forgotten some of these dates. So I organize my photos with a mixture of all of these ideas. Like I said I have a ton of photos so I start with organizing them by year and if I can’t figure out the year, then I try to guess where they would go chronologically by what is in the pictures themselves. This should whittle down this pile quite a lot. From here, you can sort pictures into subjects like Christmas or Easter or Halloween, you can also group the photos into event sections like summer vacation, birthdays or family fun. This is really more about getting the photos out of the bags and boxes and into photo-safe storage. Once you have this taken care of, your hard work is done. I am not saying this is a one, two, three project, it takes time and focus, but the end result will be so worth it. It is a fantastic accomplishment and an even better feeling knowing that all your precious memories are stored away safely. As I am sorting, I will use a photo pencil to write down a few notes, like dates or names, on the back of some of the photos or on a post-it note. This project doesn’t have to be a long drawn out thing, but it also doesn’t have to be a weekend warrior event. This is a project that you can start and continue to do a little at a time or at your own pace. I will spend the next few blogs discussing other organizing tips for your photos, I will also help with your digital files, so stay tuned. Thanks and Good Night.
Budget This…!

Ugh! I am glad I finished that work. In a previous blog “A Place For Everything…the Finale!”, I wrote about a basic household budget. Tonight, I am going to elaborate on that same budget sheet. I will include a free Excel Budget Sheet for you to use, if you need one. OK, so I happen to be one of those people who live paycheck to paycheck, it’s true…gasp…can anyone relate? This was not my plan, but it is my reality. In other words, I don’t have a ton of savings, so bill paying for me is usually a stressful event. I don’t like to be stressed! In order to make this a blissful life I am working towards managing my money better and hopefully getting out of this paycheck to paycheck life. I have set up for the next 5 months a paycheck to paycheck budget sheet, that I am hoping will make all the difference.
Actually I credit my older brother for providing the Basic Budget Sheet, but I changed it up a bit to better fit my little family. Here goes, I currently have a monthly budget of proposed bills that need to be taken care of each month and a space for Additional Expenses; such as Orthodontist and Eye Doctors, but it could be Karate for the kids or music lessons. I also have a space for all the income that is coming into the house, this includes, my husbands paycheck, my paycheck and any additional jobs either of us pick up. All the formulas are already set up on the sheet, so give it a try to see if it works for you. Other than the Monthly Budget, I added a Bi-Weekly Section, because that is how we get paid. This way I can see each pay period what is coming in and what needs to be paid. I basically take all my monthly bills and divvy them up between the pay periods, hopefully leaving some extra money for any emergency expenses or FUN! If you look at the sheets, you’ll see that you can enter dates on each weekly budget for when your bills need to be paid, the ones that are not due that week I leave blank. For example you can schedule your payment for your insurance and car payments in the beginning of the month and the electricity and cable at the end of the month. So for example I would put down 15th and 30th or whatever dates your paychecks come in on. Whichever way you like to pay your bills, you can just tweak this sheet to your liking. I am hopeful that this will alleviate some stress and make bill paying and budgeting a breeze. Please feel free to let me know what you think or if you have any suggestions or cool ideas! Thanks and Good Night.

Bi-Weekly Budget

Catch Clutter At the Door

One way that I control and eliminate some of the clutter in my house is by catching it at the front door. Yep, that’s right. I’m sure like me, you have tons of junk mail coming into your house. It doesn’t even matter that you opt out of paper bills and put yourself on a no mail solicitor list, it just keeps coming. So, to combat this issue and prevent it from becoming a problem, and by problem I mean piles and piles of paperwork, I go through it right away. Whenever I pick up the mail, I open it up and immediately get rid of the envelope it came in and the return envelope because I pay my bills online. I also recycle those newsletters and updated information sheets that I don’t need. Just by doing this, your incoming paperwork will be cut in half. Then the rest you can put in their appropriate file, folder or bin. To help with this system and because I have a few different people in my household receiving mail, I have put up a 2-Basket Wall File. In one section I put others mail and in the second section I put any mail that I don’t have time to file right then, or something that I need to deal with right away. Of course, this is still after I have opened up and gotten rid of any unwanted paperwork. The key to this system is to actually go through anything that you have put in the Wall File, don’t just transfer it to another waiting area or worse still, dump in bags and boxes. Sometimes, I come across some paperwork that I don’t know what to do with, when this happens I put it in a folder labeled “To Read” on my desktop. When I have a few minutes, I go through this folder and figure out what I need to keep and file and what I can toss. So good luck to you and those incoming clutter makers.

Organize All Your Small Craft and Office Supplies.

A simple and inexpensive way to organize arts and crafts or office supplies is with photo boxes. These little boxes are usually made of cardboard and come in a variety of colors and designs. This makes it very easy to match any room decor. The great thing about these little clutter busters, is that you can often find them on sale for about $2 a box. Many styles also have a handy area to place a label of the contents. In my craft room, I put all our Valentine making supplies in one box, labeled Valentine’s, another holds card making supplies with an appropriate label and still another houses paintbrushes, stencils, and craft paints.  I have a slew of these hard-working containers filled with craft and office supplies and all are labeled accordingly. Don’t forget to label each photo box with what is inside. You don’t want to have to open up every box to find a certain item. I love how these bins, stack and fit so perfectly on a shelf or in a bookcase. Plus, they look a lot neater and nicer on a shelf than all the clutter and chaos that comes with arts and crafts.

A Little Organization Can Go A Long Way…Literally

My organization obsession doesn’t stop once I’m outside my home. I continue it in my car and in my life. To stay organized on the go, here are a few tips. As you know, you should always have a copy of your registration and insurance card with you when driving. In my glove compartment I keep a small accordion file that holds a copy of both of these documents, along with the appropriate phone numbers of the Insurance agency. I also keep my AAA card information in here and a notepad and pen or pencil, in case I need to take down someone’s information in case of an accident. I put a small list of emergency contact numbers and any important medical conditions my family might have, like the fact that my husband is an insulin dependent diabetic. God forbid, we’re in an accident, are unconscious and my husband is not wearing his medic alert dog tags. It is always best to be prepared. Another gadget that should be in your car is a seat belt cutter. Don’t forget to keep a first aid kit in the car, I have a pretty decent one in my trunk, that doubles as a go to kit for cub scout hikes, campouts, baseball games or basically any day with a rough and tumble boy. In the trunk, I also like to keep a couple of items on hand, like bug spray, sunscreen, a pair of socks for my son and one for an adult, and a long-sleeved t-shirt or a sweatshirt. This list of items switches up depending on the season. In summer I might keep an extra pair of shorts, in case of impromptu sprinkler runs, or an extra pair of gloves in the winter for random snowball fights. I find that when I am prepared for anything, anything can happen and usually it means fun!

It’s All Fun and Games

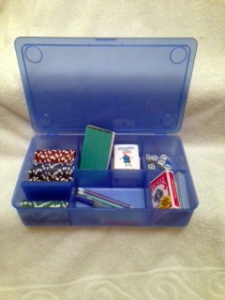
My family loves to play games, whether it is trivial pursuit, board games or cards. There is nothing better than to cozy up with family and friends on a cool night with a warm cocoa or hot coffee to play some fun games. Many times, however, I am left searching endlessly for a deck of cards or a missing die. Not anymore, I have come up with a great solution for all you game lovers out there or anyone with kids. Recently at Ikea, I saw these cute blue organizers with multiple partitions, I knew I needed to have them, I just didn’t know for what. Well, it came to me the other day as I was running to grab a pencil and paper to jot down some scores for Rummy 500…those blue bins! So I grabbed one and started to populate it with whatever game paraphernalia I thought we would need during Game Night. In one partition I put a bunch of dice, another holds pens, pencils and a small notepad to keep scores and I put a few packs of cards in there as well. My husband likes to play poker games, so I took out one of the partitions to make a larger area for all of our poker chips. My son loves charades, so I included a stack of cards for charades. Now when friends, family or my little one wants to play a game of cards, charades, or dice, I just grab some snacks and pull out my handy Game Night Organizer and we are ready to have fun.

Everything You Need For Game Night in One Place

Everything You Need For Game Night
in One Place